
It is probably the engineer in me that wants to codify things to explain and to clarify complex subjects. It is far easier to understand live streaming with schematics instead of strictly verbal explanations or equipment examples. That is why I developed this set of schematics for streaming hardware and streaming software.
Streaming Hardware Schematic
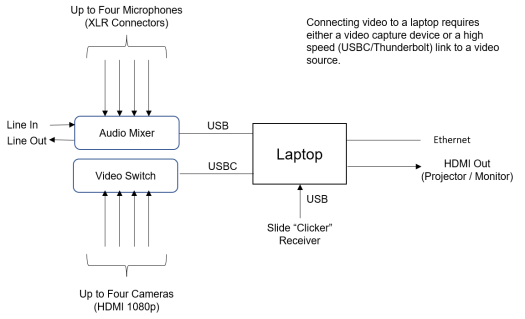
The streaming hardware schematic below shows three major components, the laptop or workstation, audio mixer, and video switch. The audio mixer in the diagram shows the typical inputs and outputs. While the diagram shows four XLR microphone inputs, there are mixers with more inputs as well as fewer. The same is true of line in and line out. Line in can be other audio sources, including instruments. Line out can go to an audio speaker system or to a recorder. Both digital and analog mixers exist and the analog mixers are the least expensive. In either case, a USB output is needed to get the audio to the laptop. In a very simple configuration the audio mixer can be replaced by a USB microphone.
The video switch allows management of multiple cameras. In this case four cameras are shown, but more expensive switches are available that handle more. The input to the switch is video from cameras. The output to the laptop is USB-C at 10 Gbps. This will not work without the high data rate provided by a USB-C port.
In a minimal configuration a video capture card or a video capture dongle can be used to connect a video camera. A video capture card is a good choice for a desktop computer. A dongle connects via USB and you need to be certain that the flavor of USB that you use will support the data rate, typically USB 3.0. Even more simple is to connect a Webcam directly to your computer via USB.
The laptop or workstation should be connected to the Internet router using Ethernet cable rather than over the air on WiFi. This supports the highest possible upload data rates for streaming. The HDMI out on the laptop supports use of a projector for slides or other video. That projector can be shared on the stream so that in-person content on a screen can be seen by the stream audience. There is room for other USB devices, such as a “clicker” to allow the presenter to advance projected slides.
Streaming Software Schematic
For streaming software schematic I chose to show what I know and that is Open Broadcaster Software (OBS). Technically, OBS is an encoder. Its function is to integrate multiple sources and encode them into a digital video and audio format for streaming as, for example, MPEG. The keyboard and mouse are used to define “scenes” to prepare for streaming and to transition between scenes during streaming. Each scene integrates various media, windows, displays, audio sources, and video sources. OBS and similar encoders use scenes to control and format the streamed content. I note that Zoom does not play well in this configuration since it requires what I consider to be a complicated workaround that can be risky.
A minimal configuration can use a streaming service web page, such as YouTube, instead of the software encoder. In this case, the stream is limited to the video from a single video source and a single audio source. Those sources can be the built-in web cam and microphone on your laptop or even on a handheld device.

Simulcast Software Schematic
Some producers like to have their streams go out over two or more streaming services. This lets viewers use the services that they prefer, including YouTube, Facebook, Twitch and others. To do this a subscription is usually needed to a third party server that connects to multiple streaming services. These servers have the bandwidth to output streams to multiple services with low latency. Low latency means that viewers are seeing the production in near real time without delays and breakups.

Schematics are Only the Beginning
Schematics are only the beginning to understanding and implementing streaming successfully. Almost everything in a full-up configuration needs some adaptation. Mixer panel settings are needed to set sound levels and other audio characteristics. On higher end video cameras, exposure levels and aperture must be set, as a minimum. Encoder scenes are developed in advance of the stream event. Streaming service parameters must be set in the encoder as well as possibly at the streaming service itself.
These schematics give you a hardware and software configuration as a basis to start planning your streaming activities. Remember that the hardware and software configurations in these schematics are very flexible and can scale for the size of your production. You can start small and work up to a more comprehensive configuration as your needs and your experience grow.
Download a PDF of the schematics here.

This work is licensed under a Creative Commons Attribution-NonCommercial-ShareAlike 4.0 International License.